Linux Installation
|| Linux Installation ||
#!/bin/bash
So I hope Partitioning an Formatting was clear through Previous Post. Now Lets move on to Installation Of Linux. As Linux is Open Source an freeware anyone can have it an modify as per there comfort.
Popular Linux Distributions:
Kali Linux
Ubuntu an all its Versions.
Centos
Debian
Android
Fedora
Arch Linux
Slackware
Putty
Android here actually means Android system that you have running in your Phone, Tablet.
As Linux Has its own kernel, Android developers find it easy to operate on cause they don't have to build there own kernel.
We will Continue with Ubuntu Installation for Linux Using Oracle Virtual Machine.
Downloads Required:
Ubuntu [ Gnome, Kubuntu, Ubuntu mate, Xubuntu ].
Oracle Virtual Machine [ For windows Host ]
Once you have Downloaded, Go for Installation Of virtual Box.
Step: 1
Create a Folder In E Drive [ Extended partition ], In my case its folder: Lonesblog
This is where we will store all Logs for Linux OS, Remember not to chose C- Drive.
Step: 2
Open Virtual Machine, Say New.
Step: 3
Name: Lonewolf
Machine Folder: Lonesblog (That's the folder Created In E-drive)
Type: Linux OS
Version: Ubuntu (64-bit)
.....Say NEXT
Step: 3
Allocating The RAM
I'll Keep it 1GB as it by Default.
Step: 4
First option is basically invalid, if you choose same system- will allocate 10GB of space by default.
Second Option allows you to create Hard-disk of your desired size.
Third Option is if you Have Created it already but did not proceed with same or use it.
So Lets go with second option.
Step: 5
Once you have specified Hard-disk size it will ask you for Hard-disk file type.
💓 VDI ( VirtualBox Disk Image )
❤ VHD ( Virtual Hard Disk )
❤ VMDK ( Virtual Machine Disk )
Its VDI for Linux OS and VHD/ VMDK are used as hard disk file type for windows OS.
Step: 6
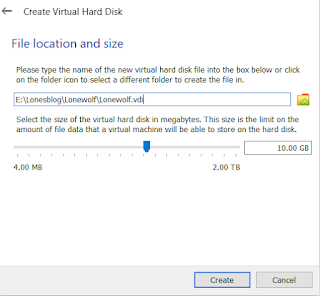
As we have specified file Location an file size prior to this step we can still make corrections at this tab
Say Create an its done.
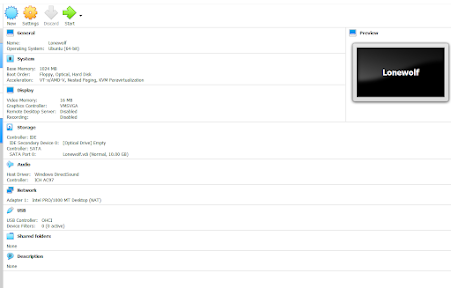
This is what you should be able to see after completing all 6 Steps.
Step: 7
Say START:
Once you Begin the system will ask for Virtual optical Disk File i,e. Ubuntu server you have downloaded. As I did ask to save the file In E-drive you will find it there.
This is the Installation for Oracle Virtual Machine for Running Linux OS [ Ubuntu ]
Once you say start system will boot an next step you will do is create Logical Partitions within extended partition [ 10GB ]
Lonewolf (Running) Virtual Machine
Select Language to : English
an Proceed.
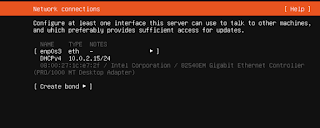
Now lets Establish Network Connection, Don't worry if you can't use Mouse On VM . All you have to do is Use Keyboard an Operate.
The Network information can be found on your device or can use public server available.
Next is the Proxy address of Ubuntu Image
Here Comes the main part I was waiting for: Creating Partition an mounting them on file system
System allows you to create Partition manually as well as Automatic Partition.
So lets talk on Partition type that are created by default or you necessarily need it.
1] "/" Partition : Its the BIOS boot that comes under "/" or you can say its the common system that runs in background when you turn on your PC. At any time if "/" Partition is corrupted you wont be able to turn on your device or Login to it.
2] /boot Partition
3] SWAP Partition
4] /home Partition
Once you have created partition of this type or even if you choose any other Partition type it works.
Now Assign your Name : Password : Confirm Password.
And REBOOT.
Now you have your Linux OS System Running.
If you Come across any issue while installation, you can comment down. As well I'll work On Video for installation an Upload On YouTube. I'll Notify for same. Thank You!!
Follow || Share


Comments
Post a Comment